Lemon Poppy Seed Pound Cake

Tuesday, December 24, 2013

Coconut Macadamia Triangles


Posted by Lisa
Source: www.mykitchencafe.blogspot.com
*Makes 24 Triangle Bars*


A co-worker brought these into work and I really enjoyed them, not only because it was something different, but because they were really good.  I made them myself for the first time for a Christmas Eve party and they were nice enough to be considered "festive" and still easy and delicious.  

1 c plus 2 tbsp all purpose flour
3/4 c firmly packed brown sugar, plus 1 tbsp
3/4 tsp salt
5 tbsp cold butter, cut into small pieces (I used 7 tbsp)
2 tbsp light corn syrup
1 tsp vanilla extract
1 large egg
1 c unsalted macadamia nuts, lightly toasted and chopped
1/2 cup shredded coconut lightly toasted
3 oz milk choc, melted

Preheat oven to 375.  Line bottom and sides of 9 inch square pan with foil letting edges hang over the pan slightly and lightly grease. 
    (I used a 9x12 tart pan and only sprayed it lightly..did not use foil)


Combine 1 c flour, 1 tbsp brown sugar and 1/2 tsp salt in a bowl. Whisk together.  Scatter butter pieces over the flour mixture and using a pastry blender cut in the butter until small crumbs form.  

Press the mixture into the prepared pan.  

Bake until the edges are golden, about 10 min.  

Meanwhile, combine 2 tbsp flour, 3/4 c brown sugar, corn syrup, vanilla, egg and 1/4 tsp salt.  Beat until thoroughly blended.  Stir in the nuts and coconut until well blended.


Spread the coconut topping over the warm baked bottom crust.

 Return to the oven and bake until the topping is lightly browned and the edges pull away from the sides of the pan, about 15-20 min.  

Let cool completely in the pan.  (This is important so the caramel layer doesn't fall apart upon cutting)

Cut into twelve rectangles, and cut each rectangle in half on the diagonal to make triangles.

Dip one corner of each triangle into the melted chocolate and let cool on parchment paper.

Serve!


Wednesday, August 28, 2013

Easy Parmesan Risotto


 See how creamy it is!  Sooo good!

 Posted by Lisa
Source: www.foodnetwork.com

Who loves Risotto?  Who doesn't like to stand at the stove stirring for 40 minutes?....me!  I saw Ina Garten make this recipe on her show and gave it a try.  
Oh my gosh, it really does turn out perfectly and it was so simple!  My kids really liked it and my skeptical husband did too.  
That is a Win Win in my book..

Ingredients:

1 1/2 cups Arborio rice
5 cups simmering chicken stock, preferably homemade, divided
(I used 1 can beef stock and 2 cans chicken, each can is about 2 cups)
1 cup freshly grated Parmesan cheese
1/2 cup dry white wine
( I did not use wine, just used 1/2 cup extra stock)
3 tablespoons unsalted butter, diced
2 teaspoons kosher salt
1 teaspoon freshly ground black pepper
1 cup frozen peas
(didn't have any so didn't add)

Directions
Preheat the oven to 350 degrees.

Place the rice and 4 cups of the chicken stock in a Dutch oven, such as Le Creuset. 

Cover and bake for 45 minutes, until most of the liquid is absorbed and the rice is al dente.

 Remove from the oven, add the remaining cup of chicken stock, the Parmesan, wine, butter, salt, and pepper, and stir vigorously for 2 to 3 minutes, until the rice is thick and creamy. 


Add the peas and stir until heated through. Serve hot.
I am sure you could stir in anything of your choice and it would be a hit.

Read more at: http://www.foodnetwork.com/recipes/ina-garten/easy-parmesan-risotto-recipe/index.html?oc=linkback

Friday, August 9, 2013

Cake Doughnuts


Posted by Lisa
source:  Food Network Magazine September 2013


I saw these in the newest issue of the Food Network Magazine and was curious if I could get them to turn out like the picture.  I am happy to say that these were surprisingly easy to make.  Just mixed it up, piped them, stuck them in the fridge till I had time later to fry them....and then wallah!  Delicious donuts!  Quick and easy is what I like to make!  They were dense and very much like a good bakery donut.  The nutmeg was very noticeable but I liked it.  If you are uncertain about that, maybe cut the amount in half.  Good luck!
Ingredients:
2 1/3 c all purpose flour
2 tsp baking powder
1 tsp freshly grated nutmeg (I used dried spice)
3/4 tsp salt
2 tbsp unsalted butter, room temp
3/4 c sugar
1 large egg plus 1 egg yolk
1/2 cup whole milk
1 tsp vanilla extract

vegetable shortening for frying

for the glaze:
1 1/2 c confectioner's sugar
3 tbsp whole milk
1 tsp finely grated lemon zest (I didn't use this)
1/4 tsp vanilla extract
pinch of salt

Directions:

1.  Line baking sheet with parchment paper.  Use a 3 inch round cookie cutter and trace 12 circles on the parchment, leaving space between them.  Turn parchment over and use as a guide.  Lightly coat with cooking spray.


2. Fit pastry bag with 1/2 inch round tip, or cut corner of resealable bag 1/2 inch.

3.  Sift flour, baking powder, nutmeg and salt into bowl.

4.  Beat butter and sugar until well combined.

5.  Add eggs and mix until it turns pale yellow.

6.  Beat in milk and vanilla until mixture is smooth, scraping sides as needed.

7.  Beat in flour mixture just until incorporated (do not over mix).

8.  Transfer to the piping bag.  Using the circles as a guide, pipe the batter into the circles.  If you have extra batter, you can make some 1 inch size donut holes.  (I had enough for 9 donuts and 8 holes)

9.  Refrigerate while you heat oil to 340.  You want about 2 inches of oil.

10.  Use scissors to cut the parchment into squares around each donut.


11.  Carefully place 2 or 3 donuts face down (parchment up) into the oil and using tongs, remove the parchment.

12.  Fry until golden about 1min 30 sec each side.

13.  Remove when golden all over and drain on paper towel.  While warm, dip each donut into the glaze and set aside to set.


Saturday, June 15, 2013

Chinese Dumplings

(I am re-posting this because I looked it up yesterday to make it and discovered that I had not included the ingredient list!!  Hellloooo!!? So here it is)

Posted by Lisa
Source: www.allrecipes.com
This was the first time I had ever had or made Chinese dumplings.  I had some ground chicken on hand so I used that instead of the pork.  They were terrific!  I did them two different ways.  The filling and the wrappings were the same but the cooking method differed slightly.  All the kids gobbled them up so I will be making these again.  

Ingredients:
1/2 c soy sauce
1 tbsp seasoned rice vinegar
1 tbsp finely chopped chinese chives
1 tbsp sesame seeds
1 tsp chile garlic sauce (such as sriracha)

1 lb ground pork (I have used ground turkey, and yesterday used cooked shredded chicken)
3 cloves garlic, minced
1 egg, beaten
2 tbsp finely chopped chinese chives
2 tbsp soy sauce
1 1/2 tbsp sesame oil
1 tbsp minced fresh ginger
50 dumpling wrappers

1 cup oil for frying

* Combine 1/2 c soy sauce, rice vinegar, 1 tbsp chives, sesame seeds and chile sauce in a small bowl and set aside.

* Mix pork, garlic, egg, 2 tbsp chives, soy sauce, sesame oil, ginger in bowl until thoroughly combined.  Place a dumpling wrapper on a lightly floured surface and spoon about 1 tbsp of filling in the middle...see below.


  • Moisten the edges and place a small amount in the center


  • Take your won ton wrappers and moisten all the edges with water.
  • Put a spoon of filling in the center and, draw up all the corners to the middle and press the seams together until they stick.
  • Set aside until they are all formed.
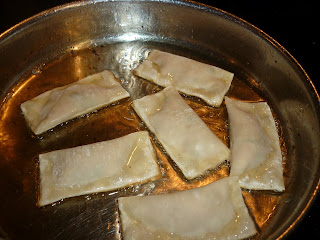
  • Some of them I just folded over in the shape of a rectangle


**this is a must!  The sauce totally made it**


  • Heat a small amount of oil in a frying pan.
  • Place the filled wrappers into the pan and gently fry until golden on the bottom.
  • I flipped them over too, even though they were folded like these above, and fried them some more.
  • Then I transferred to a second pan with about 1/4 an inch of water in it and quickly put the lid on and let it steam until I am sure the insides are done.
  • the rectangle shaped ones I just browned in the pan and did not steam.  Those stayed crisper and the browned and steamed ones were soft


Serve with a side of rice and a vegie.  I intended to serve them with vegie fried rice, but I didn't get that far this time!


Tuesday, June 11, 2013

Cornbread Salad


Posted by: Lisa
A co-worker brought this to a work party and I was surprised at how much I loved it!  This may not be new to you , but it was new to me!  I made it for dinner last night and the family thought it was great.  (except 2 of the boys said the tomatoes had to go)  picky picky.  I varied the recipe slightly and will include those changes below.  
Great salad for summer!

source:  Hometown recipes From Eva Mae Clark

Ingredients:
1 8.5 oz package cornbread mix (I used Jiffy)
1 envelope ranch-style dressing mix
1 cup sour cream
1 cup mayonnaise
1/2 c green pepper, chopped
1/2 c sweet red pepper, chopped (I didn't use those)
1/2 cup onion, chopped (I used green onions)
3 large tomatoes, diced
1 16-oz can pinto beans, drained (I used black beans)
2 cups fresh or frozen corn
2 cups cheddar cheese, shredded
10 slices cooked bacon, crumbled

Directions:

  • Bake the corn bread according to package directions and let cool.  Then crumble into small pieces
  • Combine ranch style dressing mix with the sour cream and mayonnaise
  • In small bowl, combine the beans, corn, tomatoes and onions


Assemble:

Spread 1/2 of the corn bread crumbs into the bottom of a glass bowl.  Then spread 1/2 of the bean/corn mixture.  Top that with 1/2 the cheese and then 1/2 the dressing then 1/2 the bacon.  Repeat!  


If you have a trifle bowl, use that.  This salad looks really inviting with the layers visible.  For serving, just dig down deep to make sure all layers are scooped up!  And Enjoy.


Saturday, May 25, 2013

Mint Chocolate Hi-hat Cupcakes


Submitted by Heather

Cupcakes are all the rage these days.  I can't believe how many shops can stay in business just selling cupcakes!  There must be something about having a personal-sized (actually some are big enough to share with the family) cake for yourself that makes them irresistible.  For dessert club this month, I got to choose the theme of our desserts, and I chose cupcakes.  There are just so many fun combinations!  I wasted so much time dreaming up the perfect cupcake, looking at them online, and then waffling about which one to make.  There were quite a few that I think would have been wonderful.

I chose chocolate mint, obviously, since I'm posting about it now.  I tried a trial run of a chocolate cupcake recipe, and a malted milk chocolate frosting, neither of which were that good.  My next try at a chocolate cupcake recipe was great though.  I really like these cupcakes, because they actually taste like chocolate, instead of just being brown with no flavor.  And they're moist.  The chocolate mint ganache doesn't hurt the chocolate and moistness factor either!  This chocolate cupcake recipe is my new go-to recipe any time I need to make chocolate cupcakes.

I really like the frosting too.  It is so light and fluffy and smooth!  There are those out there who don't like swiss meringue buttercream, saying it's too silky, but I don't understand.  They want to have it gritty or with sugar grains still detectable?  Those sorts of people don't deserve this cupcake.  One thing I would do is add a bit more extract to the frosting (in small increments, lest you make it taste like toothpaste).  It was good, but could have been a bit more minty.

And last, but not least, is the hi-hat portion.  How fun!  I've looked at those for years and never dared try them.  I thought it would take too much time or be too complicated.  It was really very easy.  I even did it with a frosting different from the kind most recipes use (a marshmallow frosting) when they use this coating.  So I was a bit nervous it wouldn't work out and that the buttercream would plop right into the chocolate.  Nope.  I just made sure to chill the cupcakes with the frosting on them for about 1/2 hour before dipping them in room temperature chocolate.  These cupcakes really pack a "wow" into a dessert.  My kids were so impressed and I loved them too (even though they didn't win at dessert club).  Don't be afraid - try them!

Yield: about 32 cupcakes

INGREDIENTS
For the cupcakes:
¾ cup unsweetened Dutch-process cocoa powder
¾ cup hot water
3 cups all-purpose flour
1 tsp. baking soda
1 tsp. baking powder
1¼ tsp. coarse salt
1½ cups (3 sticks) unsalted butter
2¼ cups sugar
4 large eggs, at room temperature
4 tsp. vanilla extract
1 cup sour cream, at room temperature

For the filling:
8 oz. bittersweet chocolate, finely chopped
1 cup plus 2 tbsp. heavy cream
4 tbsp. unsalted butter, cut into 4 pieces, at room temperature
2 drops of peppermint oil

For the frosting:
5 large egg whites
1 cup plus 2 tbsp. sugar
Pinch of salt
1 lb. (4 sticks) unsalted butter, at room temperature
2-3 tsp. mint extract (and maybe more - this wasn't quite minty enough for me.  But go slow - it's hard to fix if you add too much).

DIRECTIONS
To make the cupcakes, preheat the oven to 350˚ F. Line standard cupcake pans with paper liners. In a small bowl, whisk together the cocoa powder and hot water until smooth. In a medium bowl, whisk together the flour, baking soda, baking powder, and salt; set aside.

In a medium saucepan, combine the butter and the sugar over medium heat. Heat, stirring occasionally to combine, until the butter is melted. Remove the mixture from the heat and transfer to the bowl of an electric mixer fitted with a paddle attachment. Beat on medium-low speed, 4-5 minutes, until the mixture is cooled. Mix in the eggs, one at a time, scraping down the sides of the bowl as needed and beating well after each addition. Mix in the vanilla and then the cocoa mixture and beat until incorporated. With the mixer on low speed add in the dry ingredients in two batches, alternating with the sour cream, beating just until combined.

Divide the batter between the prepared cupcake liners, filling them about ¾ of the way full. Bake 18-20 minutes or until a toothpick inserted in the center comes out clean, rotating the pans halfway through baking. Allow the cupcakes to cool in the pan 5-10 minutes, then transfer to a wire rack to cool completely.


To make the ganache, place the chopped chocolate in a medium bowl with a fine mesh strainer set over the top. Add the cream to a small saucepan and bring to a simmer. Remove from the heat and pour the hot cream over the chopped chocolate. Let stand about 1 minute. With a whisk, gently stir the chocolate and cream together in small circles. When the ganache has become smooth, whisk in the butter 1 piece at a time until incorporated. Whisk in the creme de menthe, if using. Transfer the bowl to the freezer or refrigerator to chill and thicken the ganache a bit. Whisk every 5-10 minutes to help it cool evenly. Once the mixture is slightly thickened and no longer runny, you are ready to fill the cupcakes.


To assemble the cupcakes, cut a cone out of the center of each cupcake with a small paring knife. Cut off the pointed end of the cone and discard (or eat) so you are left with a cap of cake to cover the filling. Drop a spoonful of ganache into the center of each cupcake and recover the hole with the cap.


To make the frosting, combine the egg whites, sugar and salt in a heatproof bowl set over a pot of simmering water. Heat, whisking frequently, until the mixture reaches 160° F and the sugar has dissolved. Transfer the mixture to the bowl of a stand mixer fitted with the whisk attachment. Beat on medium-high speed until stiff peaks form and the mixture has cooled to room temperature, about 8 minutes.

Reduce the speed to medium and add the butter, 2 tablespoons at a time, adding more once each addition has been incorporated. If the frosting looks soupy or curdled, continue to beat on medium-high speed until thick and smooth again, about 3-5 minutes more (don't worry, it will come together!) Stir in the mint extract and mix just until incorporated. Tint with gel icing color as desired.

Add the frosting to a pastry bag fitted with a decorative tip (I used a large, unlabeled closed star tip). Frost the cupcakes. Garnish with chocolate shavings or fresh mint leaves as desired.

For The Chocolate Coating
2 cups chopped (about 12 ounces) semisweet chocolate
3 tablespoons canola or vegetable oil

Transfer cupcakes to a baking sheet, and refrigerate while preparing the chocolate coating.

Prepare the chocolate coating: Combine chocolate and oil in a medium heat-proof bowl set over a medium saucepan of barely simmering water; stir until melted and smooth. Transfer to a small bowl, and let cool about 15 minutes.  It needs to be at room temperature - not hot OR cold.

Holding each cupcake by its bottom, dip cupcake in the chocolate to coat frosting, allowing excess to drip off. Transfer to a baking sheet fitted with a wire rack. Spoon more coating around edge of cupcake and any exposed frosting; none of the frosting should show. Let cupcakes stand at room temperature 15 minutes.


SOURCE: cupcake, frosting and ganache: Annies-eats.com who adapted it from Martha Stewart
chocolate coating source: Martha Stewart

Monday, May 6, 2013

Lemon Layer Cake with Lemon Curd and Mascarpone

 By Heather

Another lemon dessert!  At the beginning of this year I started a little dessert club with some of my friends.  It's really a fun excuse to try new recipes that I would never make for my family, since half of them might dislike it and then I'd be forced to eat the rest of the dessert by myself.  This selfless service has been rendered in the past, but I'm hoping not to repeat it often.  I can no longer call my squishies "baby fat", when my smallest child is almost 3 years old.

So last month for dessert club the theme was "lemon."  And boy did we have a lot of absolutely delicious desserts.  There were so many good and beautiful treats that I'm still dreaming about them.  I was the lucky one that night, and won the prize for best dessert.  Hooray!  It was fun to win, but I only edged out two other desserts by one and two points respectively.  As I said, there were masterpieces present.

This cake was very delicious, with light spongy layers that became wonderful with the lemon simple syrup soaked in.  I made a couple of changes to the recipe (not reflected in the recipe below, though).  One, I had made a different lemon curd recipe and used that in the cake, merely because I was comfortable with that recipe and wanted to use it in another recipe I was making.  Second, I was too cheap to spend $15 on three tubs of mascarpone, so I bought one and used two 8-oz. blocks of neufchatel (light cream cheese) in place of the other two tubs.  I thought the frosting was really good, so I think you can get away with it if budget is an issue. I made the cake, curd and frosting over a couple of days and then assembled it all the day before serving.  I think that helped the flavors to meld well.  This would work really well as a special occasion cake for a citrus fan.  Or a chocolate fan - you may be surprised!


Lemon Layer Cake with Lemon Curd and Mascarpone

You'll need a pastry bag fitted with a 1/4-inch star tip to create the decorative rosettes. Begin making this cake two days before you plan to serve it.    Yield: Makes 10 to 12 servings

Ingredients:

Lemon curd:
1 cup sugar
3/4 cup fresh lemon juice
3 large eggs
3 large egg yolks
1/4 cup (1/2 stick) chilled unsalted butter, cut into 1/2-inch cubes

Cake:
6 large eggs, separated
14 tablespoons sugar
1 3/4 cups sifted cake flour (sifted, then measured)
1/4 teaspoon salt

Syrup:
1/2 cup sugar
1/2 cup boiling water
1/4 cup fresh lemon juice

Filling and frosting:
2 cups chilled heavy whipping cream
3/4 cup sugar
3 8-ounce containers chilled mascarpone cheese* or a combination of mascarpone and cream cheese

For lemon curd:
Whisk first 4 ingredients in medium metal bowl. Set bowl over saucepan of simmering water (do not allow bottom of bowl to touch water). Whisk constantly until thickened and instant-read thermometer inserted into mixture registers 160°F, about 10 minutes. Remove bowl from over water. Add butter; whisk until melted. Transfer 1 cup curd to small bowl for spreading on cake layers. Reserve remaining curd for filling. Press plastic wrap directly onto surface of both curds. Chill overnight. (Can be made 3 days ahead. Keep chilled.)
For cake:
Position rack in center of oven and preheat to 375°F. Line bottom of two 9-inch-diameter cake pans with 1 1/2-inch-high sides with parchment paper (do not grease pans or parchment). Using electric mixer, beat egg yolks and 7 tablespoons sugar in large bowl until mixture is very thick and slowly dissolving ribbons form when beaters are lifted, about 4 minutes. Using clean dry beaters, beat whites in another large bowl until soft peaks form. Add remaining 7 tablespoons sugar, 1 tablespoon at a time, beating until stiff and glossy. Fold half of whites into yolk mixture, then sift half of flour and 1/4 teaspoon salt over and gently fold in until incorporated. Fold in remaining whites, then sift remaining flour over and fold in just until combined, being careful not to deflate batter.

Divide batter between pans; smooth tops. Bake until tester inserted into center of cakes comes out clean, about 15 minutes. Cool in pans on racks.

Run knife around edge of pans to loosen cakes. Invert cakes onto 9-inch-diameter cardboard rounds, tapping on work surface if necessary to release cakes. Carefully and slowly cut each cake horizontally in half (layers will be thin). Peel off parchment.
For syrup:
Place sugar in small metal bowl. Add 1/2 cup boiling water; stir to dissolve sugar. Stir in lemon juice.

For filling and frosting:
Beat whipping cream and sugar in large bowl until peaks form. Add mascarpone to lemon curd in medium bowl; whisk until blended. Fold whipped cream into lemon-mascarpone mixture.

Place 1 cake layer, flat side up, on platter. Brush with 1/4 of syrup. Spread 1/4 cup lemon curd over, then 1 cup lemon-mascarpone filling. Top with second cake layer; brush with 1/4 of syrup and spread with 1/4 cup lemon curd and 1 cup lemon-mascarpone filling. Repeat with third cake layer, syrup, lemon curd, and filling. Top with fourth cake layer. Brush with remaining syrup, then spread remaining lemon curd over. Spoon 2 cups lemon-mascarpone filling into pastry bag fitted with 1/4-inch star tip (to be used for rosettes). Spread remaining lemon-mascarpone filling as a frosting over sides of cake. Pipe small rosettes of frosting over top of cake, covering completely. Cover cake with cake dome; refrigerate at least 6 hours and up to 1 day.

*Italian cream cheese available at Italian markets and many supermarkets.

Source: Slightly adapted from Epicurious

Monday, April 29, 2013

Lemon Dream Pie

By Heather

I recently helped a friend throw a baby shower for my dear friend Kelly.  It was a really fun time to socialize and celebrate her little one.  And the food was yummy too!  This was the first time I'd made this dessert and it won't be the last.  It was so good (if I do say so myself).  If you're a fan of lemon curd you're going to love this.  It was creamy, it was tart, it was supremely lemony!  I had recently made a lemon cake (recipe to come) and a friend who tasted both the cake and this dessert said that this was hands down the better of the two.  I'd have to agree that it was really delicious (though I still love the cake) and reminded me somewhat of a key lime pie (but better!).  It's perfect for a spring gathering or potluck - enjoy!
 

Lemon Dream Pie

Crust:
10 lemon sandwich cookies
8 whole graham crackers, broken into rough pieces
7 tablespoons unsalted butter, melted and cooled
3 tablespoons sugar

1 teaspoon lemon zest
¼ teaspoon salt

Preheat oven to 350 F. Add the cookies and crackers to the bowl of your food processor. Pulse until they are finely ground. Add the butter, sugar and lemon zest to the bowl, and continue pulsing until well combined - the mixture should start to clump just a little. Turn the mixture out into a 10-inch springform pan. Press into an even layer and half-way up the sides to form the crust. Bake for about 10-12 minutes, or until golden brown and set. Transfer the pan to a wire rack and allow the crust to cool completely, at least 30 minutes.

For The "Canary Yellow" Layer:
(I didn't use the recipe for the Canary Yellow Layer that is printed here.  I would have, but I already had homemade lemon curd on hand and wanted to use that.  The recipes seemed very similar, so I wouldn't hesitate to use the recipe here.)
1 ¼ cups sugar
1 cup of lemon juice (from about 6 lemons)
½ cup water
¼ cup cornstarch
¼ tsp. salt
8 large egg yolks
2 tbsp. grated lemon zest
3 tbsp. unsalted butter, softened and cut into pieces

Whisk sugar, lemon juice, water, cornstarch and salt together in a large non-reactive saucepan until cornstarch is dissolved. Bring to a simmer over medium heat, whisking occasionally until mixture is translucent and begins to thicken, about 5 minutes.

Whisk in yolks until combined. Stir in zest and butter. Bring to a simmer and stir constantly until mixture is thick enough to coat the back of a spoon, about 2 minutes.

Strain through fine mesh strainer into the baked and cooled pie shell and scrape off filling from the bottom of strainer. Reserve about 3 tbsp in a small dish for the decoration. Refrigerate while making creamy layer.

Creamy Filling Layer:
1 cup fresh lemon juice (about 6 lemons) and 1 tablespoon grated fresh lemon zest
1 ¼ teaspoons unflavored gelatin
¼ cup sugar
1 (8‑ounce) package cream cheese, softened
1 (14‑ounce) can sweetened condensed milk
⅓ cup instant vanilla pudding mix
1 teaspoon vanilla extract
Stir ¼ cup of the lemon juice and gelatin together in a small bowl and let sit to soften.

Process the sugar and lemon zest together in a food processor until the sugar turns bright yellow, about 30 seconds. Add the cream cheese and continue to process until combined, about 30 seconds. Add the condensed milk and pudding mix and continue to process until smooth, about 30 seconds. Scrape down the sides of the work bowl.

Microwave the lemon juice mixed with gelatin until warm (just before bubbling), about 15-30 seconds. Stir to dissolve the gelatin.

With the food processor running, pour the warm gelatin mixture, remaining lemon juice, and vanilla through the feed tube and continue to process until thoroughly combined, about 30 seconds. Pour the creamy filling into the pie shell on top of yellow layer and smooth the top with a spatula.

Transfer the reserved Canary Yellow filling to a small resealable plastic bag and snip one of the corners. Pipe thin, parallel lines of the Yellow filling onto the creamy layer, then drag a knife or toothpick through the lines (perpendicular to them) to create a decorative pattern.

Refrigerate the pie, uncovered, until chilled and set, about 6 hours. Serve chilled with whipped cream (optional - I forgot to get out the whipped cream and we never missed it).

Source: This was adapted slightly from my friend's blog, http://virtualgoodyplate.blogspot.com/, and was called Bill Bryson's Dream-Fulfilling Lemon Pie (after a book - they were having literature night). 

Friday, April 19, 2013

Chocolate Cake


I saw a picture of Martha Stewart's cake and thought that was a great cake for Easter!  So I set out to make it.  The above picture is my attempt at it.  It doesn't quite look like her elegant one, but the taste was amazing.  The quality and texture of the cake was wonderful.  The frosting was sweet but that was because I substituted milk chocolate for the bittersweet.  Next time I would probably use the bittersweet.  Definitely a keeper!

Source: www.marthastewart.com  Chocolate Cake with Crepe Paper Flowers and a Phyllo Nest
Posted by Lisa
  • For the Cake

    • Unsalted butter, room temperature, for pans
    • 2 1/2 cups all-purpose flour
    • 2 1/2 cups granulated sugar
    • 1 1/4 cups unsweetened Dutch-process cocoa powder, plus more for pans
    • 2 1/2 teaspoons baking soda
    • 1 1/4 teaspoons baking powder
    • 1 1/4 teaspoons salt
    • 2 large eggs, plus 1 large egg yolk
    • 1 1/4 cups buttermilk
    • 3/4 cup warm water
    • 1/2 cup plus 2 tablespoons vegetable oil
    • 1/2 cup dark rum
    • 1 1/4 teaspoons vanilla extract
  • Make the cake: Butter two 10-by-2-inch round cake pans. Line with parchment cut to fit, and butter parchment. Dust with cocoa, and tap out excess. Sift flour, sugar, cocoa, baking soda, baking powder, and salt into the bowl of a mixer. Add remaining ingredients. Mix on low speed until smooth, about 3 minutes. Divide batter among prepared pans.
  • Bake, rotating pans halfway through, until a toothpick inserted into centers of cakes comes out clean, about 35 minutes. Let cool in pans on wire racks for 45 minutes. Run a knife around edges of cakes to loosen, and turn onto racks. Remove parchment, turn cakes right side up, and let cool completely.
  • For the Frosting

    • 4 1/2 cups confectioners' sugar
    • 1/2 cup unsweetened Dutch-process cocoa powder
    • 1/4 teaspoon salt
    • 12 ounces cream cheese, room temperature
    • 1 1/2 sticks (3/4 cup) unsalted butter, room temperature
    • 18 ounces bittersweet chocolate, melted
    • 1 1/2 cups sour cream
  • Make the frosting: Sift confectioners' sugar, cocoa, and salt into a bowl. In the bowl of a mixer, beat cream cheese and butter on medium-high speed until fluffy, about 4 minutes. Reduce speed to low. Gradually add sugar mixture, beating until combined. Beat in melted chocolate and sour cream until combined
    • For the Garnish

      • 1 thick 16-ounce block bittersweet chocolate, room temperature
      • Confectioners' sugar, for dusting (optional)
      • Phyllo nest
      • Small candy-coated chocolate eggs
    • Make the garnish: Using a vegetable peeler, scrape chocolate at a 45-degree angle. Using a spatula, transfer curls to a parchment-lined baking sheet. Cover with plastic wrap, and refrigerate for at least 30 minutes (or up to 4 days).
      (I tried this and it did not work...at all.  I ended up tempering my own chocolate and then spreading it on the back of a cookie sheet, and using a small metal spatula, scraping it up before it set completely and making curls.  It actually worked. Surprised me!  Beware that the chocolate sets up pretty fast so you have to move quickly)

  • For the Nest

    • 2 teaspoons unsalted butter, melted, plus more for mold
    • 1/2 ounce ( 1/2 cup) kataifi (a type of phyllo), thawed
    • Cocoa powder, for dusting
  • Make the nest: Preheat oven to 350 degrees. Lightly brush a 1/3-cup-capacity round silicone mold with butter. In a bowl, gently toss butter and kataifi to combine.
  • Lift kataifi out of bowl, gently stretching strands to form a loose rope. Lay 1 end in the cupped fingers of 1 hand. Gently spiral rope to shape into a nest.
  • Fit nest into mold, pulling up edges to rest over rim. Place on a baking sheet. Bake until golden brown, 25 to 30 minutes. Let cool completely in mold on a wire rack. Unmold. Dust with cocoa.


I tempered good quality chocolate and made the curls that way.


  1. To assemble: Using a serrated knife, trim tops of cakes to create level surfaces. Reserve trimmings


  1. Place 1 cake, cut side up, on a cake stand. Spread 2 cups frosting over top. Top with remaining cake, cut side up.


  1. Spread remaining frosting over top and sides


  1. Using tweezers, gently press chocolate curls to sides of cake. Dust top with confectioners' sugar if desired. Decorate with nest, chocolate eggs, and flowers


  1.  Finely grind cake trimmings in a food processor


  1. Sprinkle crumbs over top of cake.