Lemon Poppy Seed Pound Cake

Wednesday, February 19, 2014

Orange Cinnamon Bread

Posted by Lisa


I have a co-worker whose husband makes her a loaf of orange cinnamon bread as a gift of love to her.  She brings it in to share with us and toasted up, it is heavenly!  I have not gotten his recipe from him yet, but I found this one online and it is terrific.  I made a double batch this morning and it turned out amazing.  I have enough for the family and some to share! My friend said she also uses it to make french toast...can't wait to try that too.
**both times I have made this I was unable to get all of the flour kneaded in, almost 1 1/2 to 2 cups less!  So don't be alarmed if you can't either**

source:Taste of Home

Ingredients

  • 2 packages (1/4 ounce each) active dry yeast
  • 1/4 cup warm water (110° to 115°)
  • 1 cup milk
  • 3/4 cup orange juice
  • 1 cup sugar, divided
  • 1 tablespoon grated orange peel
  • 1-1/2 teaspoons salt
  • 1 egg
  • 6-1/2 to 7 cups all-purpose flour
  • Additional water
  • 2 teaspoons ground cinnamon
  • GLAZE:
  • 1 cup confectioners' sugar
  • 2 tablespoons orange juice

Directions


In a large bowl, dissolve yeast in warm water. In a saucepan, heat milk and orange juice to 110°, add to yeast mixture. Stir in 1/2 cup sugar, orange peel, salt, egg and 3 cups flour; beat until smooth. Add enough remaining flour to form a soft dough.

Turn onto a floured surface; knead until smooth and elastic, about 6-8 minutes. Place in a greased bowl, turning once to grease top. Cover and let rise in a warm place until doubled, about 1 hour.

Punch dough down; divide in half. Roll each portion into a 15-in. x 7-in. rectangle. Brush with water. Combine cinnamon and remaining sugar; sprinkle over dough to within 1 in. of edge.


Tightly roll up, jelly-roll style, starting with a short side; seal ends. Place seam side down into two greased 9-in. x 5-in. loaf pans. Cover and let rise in a warm place until doubled, about 1 hour.


Bake at 350° for 35-40 minutes or until golden brown. Remove from pans to cool on a wire rack. Combine glaze ingredients; drizzle over bread. Yield: 2 loaves


Saturday, February 15, 2014

Chicken Cheese balls

Submitted by Lisa


I had some left over cooked/shredded chicken in the fridge and decided to make these to go along with the easy risotto recipe.
Very quick and easy to make.  You can adjust the flavor by adding a little bbq sauce, or buffalo sauce to the chicken mixture.
They have a really nice crunch!  


Ingredients

1 rotissere chicken (picked apart and chopped small)
1/4 c green onion chopped
1 1/2 c cheddar cheese shredded
salt/pepper to taste

panko bread crumbs
flour
3 eggs
oil

Directions:

1.  Shred and chop the chicken, put in bowl.
2.  Add cheese, green onions, and salt and pepper.  Mix well
3.  Make balls the size of golf balls and press them firmly together
4.  Gently roll them into the flour, then the egg, then the panko crumbs
(my pictures for this step were black!  So, use 3 different bowls, one with flour, one for the eggs with a splash of water-whisk them, and one for the panko crumbs)

5.  Set aside and let sit for 5 to 10 min
6.  Heat 1/2 inch oil in frying pan.  4 at a time place them gently in the oil and rotate as they cook, until golden brown.
7.  Place them on a paper towel to dry.


**They cook quickly so don't walk away from them!  Adjust heat as you need to in order to prevent them from burning.**

Saturday, January 18, 2014

Corn Bread

Posted by Lisa
Source:  internet search for Frontier Pies cornbread...not sure if it is or not


I am not a corn bread lover.  It is always dry and crumbly and I just don't enjoy it.  UNTIL, I had it again recently at a restaurant.  When I lived in Utah there was a restaurant that served the most delicious corn bread to everyone while they waited for their meals.  I had the privilege of eating there this last weekend and being reminded that there are actually good corn bread recipes!  I searched online to see if I could find a copy-cat recipe and this is what I found.  I am very pleased with it.  

Best served warm with honey and butter or honey butter

Ingredients:

1 cup margarine  ( I used butter)
1 1/2 cups sugar
4 eggs
2 1/4 cups flour
3 tsp. baking powder
1 1/2 cups cornmeal
3/4 tsp. salt
2 1/4 cups milk

Cream the margarine and sugar. Add eggs, one at a time. Add dry ingredients (flour, baking powder, cornmeal and salt). Stir in milk until well combined. Pour in a greased 13x9 pan and bake at 375 degrees for 35-40 minutes.


Tuesday, December 24, 2013

Coconut Macadamia Triangles


Posted by Lisa
Source: www.mykitchencafe.blogspot.com
*Makes 24 Triangle Bars*


A co-worker brought these into work and I really enjoyed them, not only because it was something different, but because they were really good.  I made them myself for the first time for a Christmas Eve party and they were nice enough to be considered "festive" and still easy and delicious.  

1 c plus 2 tbsp all purpose flour
3/4 c firmly packed brown sugar, plus 1 tbsp
3/4 tsp salt
5 tbsp cold butter, cut into small pieces (I used 7 tbsp)
2 tbsp light corn syrup
1 tsp vanilla extract
1 large egg
1 c unsalted macadamia nuts, lightly toasted and chopped
1/2 cup shredded coconut lightly toasted
3 oz milk choc, melted

Preheat oven to 375.  Line bottom and sides of 9 inch square pan with foil letting edges hang over the pan slightly and lightly grease. 
    (I used a 9x12 tart pan and only sprayed it lightly..did not use foil)


Combine 1 c flour, 1 tbsp brown sugar and 1/2 tsp salt in a bowl. Whisk together.  Scatter butter pieces over the flour mixture and using a pastry blender cut in the butter until small crumbs form.  

Press the mixture into the prepared pan.  

Bake until the edges are golden, about 10 min.  

Meanwhile, combine 2 tbsp flour, 3/4 c brown sugar, corn syrup, vanilla, egg and 1/4 tsp salt.  Beat until thoroughly blended.  Stir in the nuts and coconut until well blended.


Spread the coconut topping over the warm baked bottom crust.

 Return to the oven and bake until the topping is lightly browned and the edges pull away from the sides of the pan, about 15-20 min.  

Let cool completely in the pan.  (This is important so the caramel layer doesn't fall apart upon cutting)

Cut into twelve rectangles, and cut each rectangle in half on the diagonal to make triangles.

Dip one corner of each triangle into the melted chocolate and let cool on parchment paper.

Serve!


Wednesday, August 28, 2013

Easy Parmesan Risotto


 See how creamy it is!  Sooo good!

 Posted by Lisa
Source: www.foodnetwork.com

Who loves Risotto?  Who doesn't like to stand at the stove stirring for 40 minutes?....me!  I saw Ina Garten make this recipe on her show and gave it a try.  
Oh my gosh, it really does turn out perfectly and it was so simple!  My kids really liked it and my skeptical husband did too.  
That is a Win Win in my book..

Ingredients:

1 1/2 cups Arborio rice
5 cups simmering chicken stock, preferably homemade, divided
(I used 1 can beef stock and 2 cans chicken, each can is about 2 cups)
1 cup freshly grated Parmesan cheese
1/2 cup dry white wine
( I did not use wine, just used 1/2 cup extra stock)
3 tablespoons unsalted butter, diced
2 teaspoons kosher salt
1 teaspoon freshly ground black pepper
1 cup frozen peas
(didn't have any so didn't add)

Directions
Preheat the oven to 350 degrees.

Place the rice and 4 cups of the chicken stock in a Dutch oven, such as Le Creuset. 

Cover and bake for 45 minutes, until most of the liquid is absorbed and the rice is al dente.

 Remove from the oven, add the remaining cup of chicken stock, the Parmesan, wine, butter, salt, and pepper, and stir vigorously for 2 to 3 minutes, until the rice is thick and creamy. 


Add the peas and stir until heated through. Serve hot.
I am sure you could stir in anything of your choice and it would be a hit.

Read more at: http://www.foodnetwork.com/recipes/ina-garten/easy-parmesan-risotto-recipe/index.html?oc=linkback

Friday, August 9, 2013

Cake Doughnuts


Posted by Lisa
source:  Food Network Magazine September 2013


I saw these in the newest issue of the Food Network Magazine and was curious if I could get them to turn out like the picture.  I am happy to say that these were surprisingly easy to make.  Just mixed it up, piped them, stuck them in the fridge till I had time later to fry them....and then wallah!  Delicious donuts!  Quick and easy is what I like to make!  They were dense and very much like a good bakery donut.  The nutmeg was very noticeable but I liked it.  If you are uncertain about that, maybe cut the amount in half.  Good luck!
Ingredients:
2 1/3 c all purpose flour
2 tsp baking powder
1 tsp freshly grated nutmeg (I used dried spice)
3/4 tsp salt
2 tbsp unsalted butter, room temp
3/4 c sugar
1 large egg plus 1 egg yolk
1/2 cup whole milk
1 tsp vanilla extract

vegetable shortening for frying

for the glaze:
1 1/2 c confectioner's sugar
3 tbsp whole milk
1 tsp finely grated lemon zest (I didn't use this)
1/4 tsp vanilla extract
pinch of salt

Directions:

1.  Line baking sheet with parchment paper.  Use a 3 inch round cookie cutter and trace 12 circles on the parchment, leaving space between them.  Turn parchment over and use as a guide.  Lightly coat with cooking spray.


2. Fit pastry bag with 1/2 inch round tip, or cut corner of resealable bag 1/2 inch.

3.  Sift flour, baking powder, nutmeg and salt into bowl.

4.  Beat butter and sugar until well combined.

5.  Add eggs and mix until it turns pale yellow.

6.  Beat in milk and vanilla until mixture is smooth, scraping sides as needed.

7.  Beat in flour mixture just until incorporated (do not over mix).

8.  Transfer to the piping bag.  Using the circles as a guide, pipe the batter into the circles.  If you have extra batter, you can make some 1 inch size donut holes.  (I had enough for 9 donuts and 8 holes)

9.  Refrigerate while you heat oil to 340.  You want about 2 inches of oil.

10.  Use scissors to cut the parchment into squares around each donut.


11.  Carefully place 2 or 3 donuts face down (parchment up) into the oil and using tongs, remove the parchment.

12.  Fry until golden about 1min 30 sec each side.

13.  Remove when golden all over and drain on paper towel.  While warm, dip each donut into the glaze and set aside to set.


Saturday, June 15, 2013

Chinese Dumplings

(I am re-posting this because I looked it up yesterday to make it and discovered that I had not included the ingredient list!!  Hellloooo!!? So here it is)

Posted by Lisa
Source: www.allrecipes.com
This was the first time I had ever had or made Chinese dumplings.  I had some ground chicken on hand so I used that instead of the pork.  They were terrific!  I did them two different ways.  The filling and the wrappings were the same but the cooking method differed slightly.  All the kids gobbled them up so I will be making these again.  

Ingredients:
1/2 c soy sauce
1 tbsp seasoned rice vinegar
1 tbsp finely chopped chinese chives
1 tbsp sesame seeds
1 tsp chile garlic sauce (such as sriracha)

1 lb ground pork (I have used ground turkey, and yesterday used cooked shredded chicken)
3 cloves garlic, minced
1 egg, beaten
2 tbsp finely chopped chinese chives
2 tbsp soy sauce
1 1/2 tbsp sesame oil
1 tbsp minced fresh ginger
50 dumpling wrappers

1 cup oil for frying

* Combine 1/2 c soy sauce, rice vinegar, 1 tbsp chives, sesame seeds and chile sauce in a small bowl and set aside.

* Mix pork, garlic, egg, 2 tbsp chives, soy sauce, sesame oil, ginger in bowl until thoroughly combined.  Place a dumpling wrapper on a lightly floured surface and spoon about 1 tbsp of filling in the middle...see below.


  • Moisten the edges and place a small amount in the center


  • Take your won ton wrappers and moisten all the edges with water.
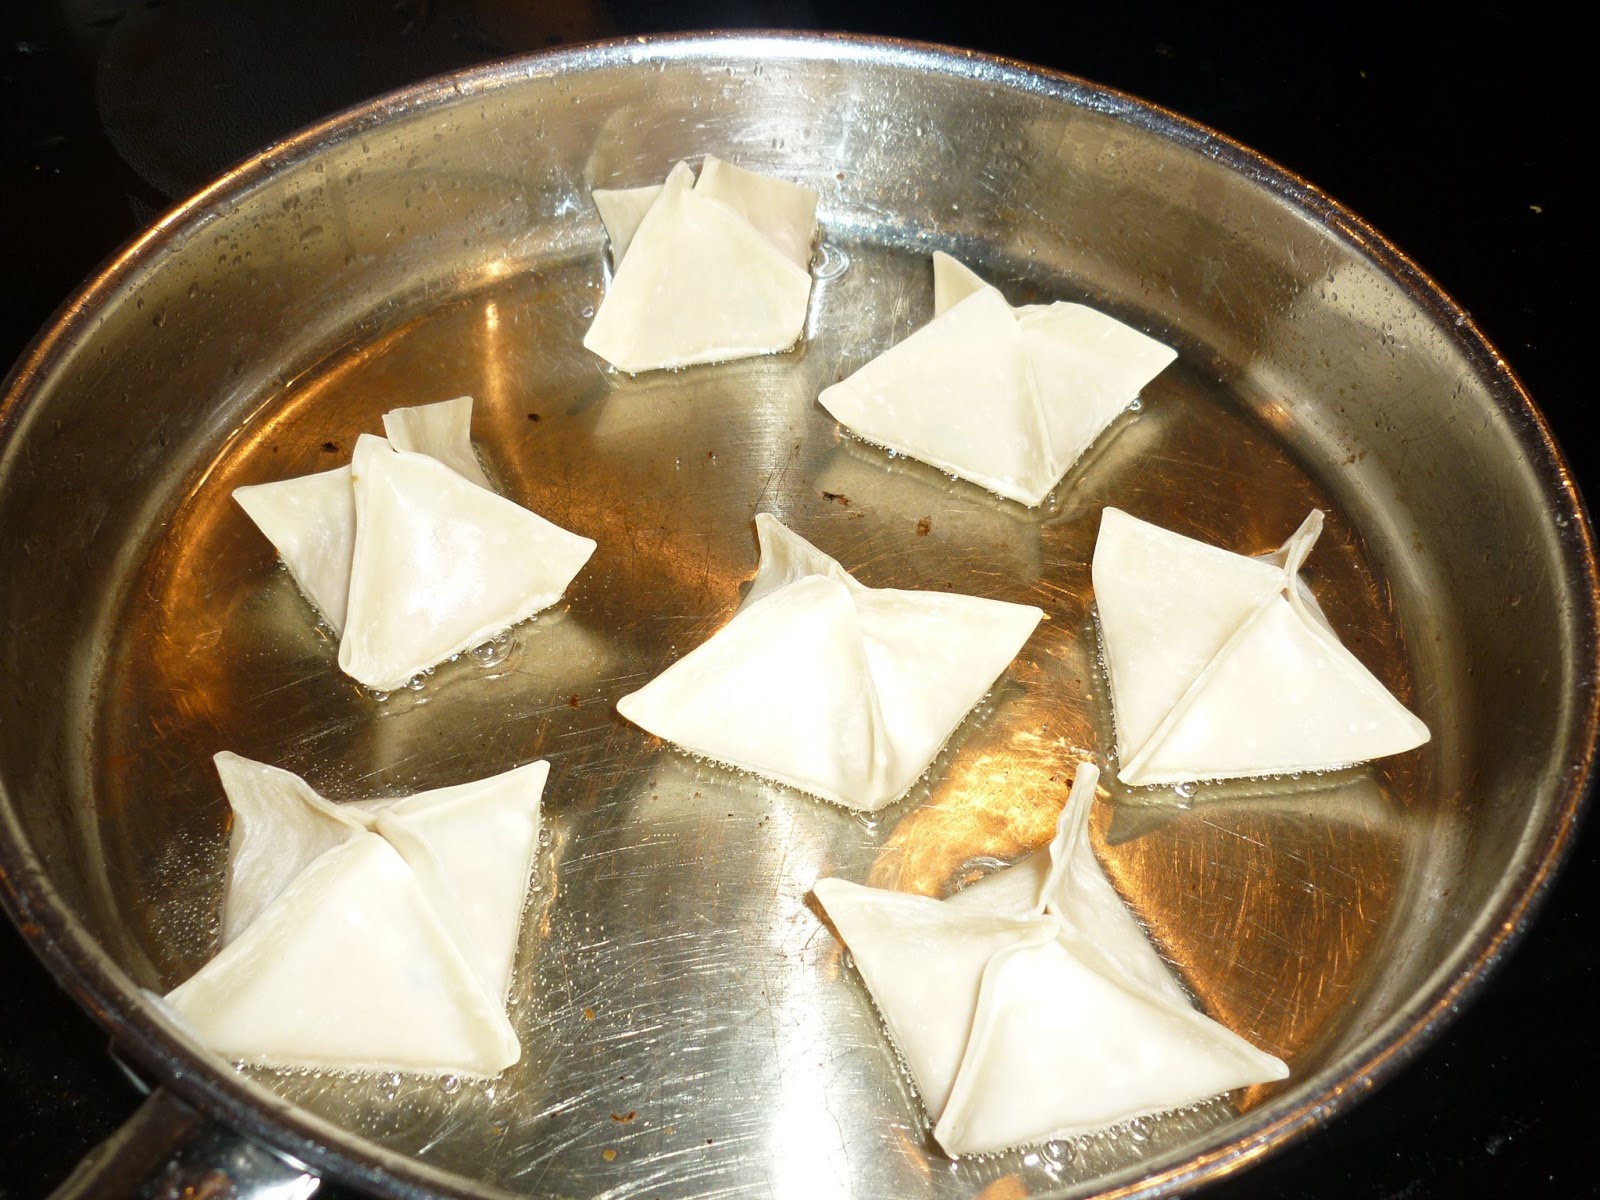
  • Put a spoon of filling in the center and, draw up all the corners to the middle and press the seams together until they stick.
  • Set aside until they are all formed.
  • Some of them I just folded over in the shape of a rectangle


**this is a must!  The sauce totally made it**


  • Heat a small amount of oil in a frying pan.
  • Place the filled wrappers into the pan and gently fry until golden on the bottom.
  • I flipped them over too, even though they were folded like these above, and fried them some more.
  • Then I transferred to a second pan with about 1/4 an inch of water in it and quickly put the lid on and let it steam until I am sure the insides are done.
  • the rectangle shaped ones I just browned in the pan and did not steam.  Those stayed crisper and the browned and steamed ones were soft


Serve with a side of rice and a vegie.  I intended to serve them with vegie fried rice, but I didn't get that far this time!