Thursday, April 28, 2011

Soft Pretzels


These are quicker to make than the other recipe I have used in the past. I like it just as well. As you can see from my picture, they didn't hold their "pretzel" shape...that is because I make them quite small. Single serving size. So, they tend to fill in on them selves. You can certainly make them bigger and not have that happen. Either way, they are really good and the kids love to help shape them.

1 cup milk
1 pkg active dry yeast
3 tbsp packed light brown sugar
2 1/4 c flour, plus more for kneading
10 tbsp unsalted butter, plus more for greasing
1 tsp fine salt
1/3 c baking soda
2 tbsp coarse salt

For the Sauce:
1/4 c mayonnaise
1/4 c dijon mustard
3 tbsp packed brown sugar
1/2 tsp cider vinegar

Make the pretzels:
1. Warm the milk in a saucepan until it's about 110 degrees; pour into a medium bowl and sprinkle in the yeast. Let the yeast soften, about 2 minutes.
2. Stir in the brown sugar and 1 cup flour with a wooden spoon.

3. Dice 2 tbsp butter and soften; stir into the mix.

4. Add the remaining 1 1/4 c flour and the fine salt to make s sticky dough.

5. Turn the dough out onto a lightly floured surface and knead, adding more flour if needed, until smooth but still slightly tgacky, about 5 minutes.

6. Shape into a ball, place in a lightly greased bowl and cover with plastic wrap. Let rise in warm spot until doubled in size, about 1 hr.

7. Pre heat the oven to 450 degrees and grease a large baking sheet. ( I use parchment paper)

8. Punch the dough to deflate it, then turn out onto a lightly floured surface. (If the dough seems tight, cover and let rest until it relaxes)

9. Divide the dough inot 6 pieces. Roll and stretch each piece with the palms of your hands into a rope.

10. Form each rope into a pretzel shape.

11. Dissolve the baking soda in 3 cups warm water in a shallow dish. Gently dip each pretzel in the soda solution, then arrange on the baking sheet.

12. Sprinkle with the coarse salt.

13. Bake until golden, 10 to 12 min.


14. Melt the remaing 8 tbsp butter in shallow dish and dip the hot pretzels in the butter when out of oven. Place on wire rack to cool slightly. Serve warm. Store in air tight container.
(These are best fresh)

Egg Rolls...with variations

I am a huge fan of egg roll wrappers. I use them quite often for the left overs in the fridge. The recipe I am posting is not using leftovers, but is a delicious way to make a meal everyone will enjoy.

2 stalks celery chopped small
1/2 large onion chopped small
2 carrots chopped up small and even
Cabbage..about 1 1/2 cups chopped
olive oil
1 tbsp butter
4 long dashes soy sauce
3 quick dashes balsamic vinegar
salt
pepper
1 tbsp garlic
2 tsp ground ginger
2 cups shredded pre-cooked chicken
1 pkg egg roll wrappers
1 egg..beaten with 1 tsp water
1. Chop the onion, celery, carrot, cabbage. Add about 2 tbsp olive oil to pan, once hot add the chopped vegies. Saute for a couple of minutes.
2. Add butter, 1/4 cup water and 3 dashes of balsamic vinegar and put lid on and let it steam for about 4 minutes. Stir and check tenderness. If still firm, add a bit more water if needed and the soy sauce and put lid back on.
3. Once tender, add salt and pepper as needed and the shredded chicken, garlic and ginger. Stir well. Turn off heat and replace lid. Let sit until ready to make the rolls.
4. Set up a cutting board, empty plate, pastry brush, egg/water in small dish.
5. Take lid off the chicken mixture and let cool a bit. If too hot, it will melt a whole in the wrapper as you try to put them together.
6. Take out the egg roll wrappers and assemble per package directions. I brush the edges of the wrapper with the egg wash, put a spoon ful of the mixture in the center and roll it up with one corner over the mixture, fold in the side corners and roll towards the last corner. Once rolled up, set on the empty plate, and start again until all the wrappers are used.
7. Clean out the pan you were cooking the vegies in. Add enough oil so the egg rolls will be sitting in oil 1/2 way up the side of them. Heat till hot, about med/high temp.
8. Add the egg rolls and fry until golden, flip over and fry the other side. Don't crowd the pan! You will cause the oil temp to drop and end up with soggy egg rolls. yuck.
9. Once you have some fried, transfer to a paper towel lined plate to drain, then transfer to warm oven to keep heated while you fry the rest.
**Variations**
  1. You can use left over stir fry. The day after, chop up the stir fry so it is small and uniform. Mix in a bit of the rice and wrap in the egg roll wrappers
  2. Take refried beans, smashed black beans, saute some onion and garlic, add a can of diced green chiles and mix with the beans. Add this with a touch of cheese and taco sauce to the egg roll wrapper and fry them up.
  3. You can use left over beef roast, grill up some red and green peppers, add some taco seasoning and cheese and wrap these up. Delish!

Wednesday, April 27, 2011

Kung Pao Ramen Noodles

Submitted by Heather

Who doesn't like Ramen Noodles?  I think it's one of those foods that people feel embarrassed about liking.  Or at least admitting that they like it. Obviously, ramen noodles aren't the healthiest food, but they're quick and satisfying.  This recipe is a great way to make a junk food into one that you can feel good about. You throw in a few veggies and some lean meat and voila!  You have a healthy meal.  Admittedly, it takes longer than tossing a pack of ramen in boiling water for 3 minutes, but it's so tasty it's worth the extra time. 


I differed from the original recipe slightly.  I didn't have a red pepper, but I did have a monster bag of stir fry vegetables from Costco that were begging to be thrown into this dish (yea - no extra chopping!).


*Serves 4-5
3 tablespoons canola oil
1 pound boneless, skinless chicken breasts (about 2-3), cubed or sliced thinly
1 red bell pepper, cored and sliced thin (or 2-3 cups of stir fry vegetables)
1/2 cup roasted unsalted peanuts
3 garlic cloves, finely minced
1 tablespoon grated fresh ginger (or 1/4 tsp ground ginger)
1/2 teaspoon red pepper flakes (add more if you want more heat)
3 1/2 cups low-sodium chicken broth
4 (3-ounce) package ramen noodles, discard seasoning packets
2 tablespoons hoisin sauce
1 tablespoon rice vinegar
2 teaspoons toasted sesame oil
4 scallions (green onions), sliced thin

In a 12-inch nonstick skillet, heat 2 tablespoons of the canola oil over medium to medium-high heat until it is hot and rippling. Season the chicken lightly with salt and pepper. Add the chicken to the pan in a single layer and cook, stirring occasionally, until the chicken is browned and cooked through, 5-7 minutes. Remove the chicken to a medium bowl.
Add the last tablespoon of oil to the skillet and heat until hot and rippling. Add the red bell pepper and the peanuts and cook until the pepper is softened, 2 to 3 minutes. Remove the mixture into the bowl with the chicken, trying to leave as much oil as possible behind in the skillet.
Add the garlic, ginger and red pepper flakes to the remaining oil in the skillet and cook over medium heat, stirring constantly, for about 30 seconds to 1 minutes. Stir in the chicken broth. Break the bricks of ramen into small chunks and add them to the skillet. Bring the mixture to a simmer and cook, tossing the ramen constantly with tongs to separate, until ramen is just tender but there is still a bit of liquid in the pan, about 2-4 minutes.
Stir in the hoisin sauce, vinegar, and sesame oil and continue to simmer until the sauce is slightly thickened, about 1 minute. Stir in the chicken, peppers and peanuts. Sprinkle with green onions before serving.


Source: Melskitchencafe.com who adapted it from The Best 30-Minute Recipe

Monday, April 25, 2011

Yogurt Orange and Lemon Mini Cupcakes

Submitted by Lisa

These are from www.DisneyFamily.com . I made them for Easter and they were a big hit. More of an adult dessert than young children.

Prep time 15 min.
Cooking time 20 min.
Makes 18 mini cupcakes (suitable for freezing un-iced)
4 tbsp unsalted butter softened
1/2 c superfine sugar (I blended my reg. white sugar a bit)
1 medium egg at room temperature
finely grated zest of 1/2 small lemon
finely grated zest of 1/2 lime
1/2 tsp finely grated orange zest
1 heaping cup of self rising flour
3 tbsp whole milk plain yogurt

For the icing:
2 cups confectioners sugar
1 tbsp fresh orange juice
1 tbsp lime juice
(I ended up using more of the orange and lime juice)

1. Pre heat oven 350 and line mini muffin pans with paper cupcake holders.
Cream the butter and sugar until pale and fluffy. Gradualy add the egg, beating well between additions.

2. Stir in zests. Sift in the flour and fold in well.

3. Stir in yogurt. Divide the mixture among the muffin cups.

4. Bake for 18 to 20 min until risen, lightly golden brown and firm to the touch. Let cool in the pan for 5 min then transfer to a rack and cool completely.

5. Meanwhile make the icing. Sift the powdered sugar into a bowl. Make a well and stir in the juices and beat well. Spoon icing onto cooled cupcakes and allow to set up for 30 min. Store in airtight container for up to 5 days. Un-iced cupcakes can be frozen in a re-sealable box or freezer bag.

White Chocolate Raspberry Torte


I got this recipe from a friend at work. She got it out of the Pillsbury bake off book. I tried it for the first time this weekend for our Easter party. I think it turned out really well. Very good, rich desert for a special occasion.

16 oz. coarsely chopped white baking bars or 2 1/2 cups vanilla milk chips
1/2 c butter
4 eggs
3/4 c sugar
1 1/2 c all purpose flour
1/8 tsp salt
1/4 tsp almond extract (I used vanilla)
1 c frozen raspberries with out syrup
2/3 c coarsely chopped almonds
Glaze:
1/4 c semi sweet choc chips
1 tsp powdered sugar
(I added more powdered sugar and about 2 tsp of butter, it was a better consistency)

1. Heat oven to 350. Lightly grease and flour bottom and sides of 9 or 10 inch spring form pan. In medium saucepan over very low heat, melt 8 ounces of the white baking chocolate and butter, stirring constantly until smooth. Cool slightly.

2. In large bowl, beat eggs on high speed until light lemon colored, about 3 minutes. Gradually add sugar, beating until thickened and very light yellow. Lightly spoon flour into measuring cup; level off. By hand, fold in flour, salt, extract, melted white choc and the remaing 8 ounces of chopped baking chocolate. Fold in raspberries.

3. Spread in greased and floured pan. Sprinkle the almonds; press slightly.

4. Bake for 55 to 65 minutes or until top is golden brown and springs back when touched lightly in center. Cool 30 minutes. Remove sides of pan; cool completely.

Glaze:
Melt choc chips in small sauce pan over low heat, stirring constantly, until smooth. Using wire whisk, beat in powdered sugar until smooth. Drizzle glaze over top of torte; allow to set. Serve at room temperature. Store in refrigerator.

16 servings
(High altitude- above 3500 ft: decrease sugar to 1/2 cup and increase flour to 1 3/4 c.)

Wednesday, April 20, 2011

Cold Sesame Noodles


I have been a Food Network Junkie since that channel began, I literally started watching it at 13 years old. I love watching cooking shows and trying the recipes at home. Sometimes they are as good as they look and sometimes it is just a failed attempt but I found a winner in this one. This is a Tyler Florence recipe and it is great, it is as good as any takeout you can get. My husband loves this dish and if you are looking for something to try that is different than your same repertoire of recipes this would be a good one. It is a Thai inspired dish and it does not call for any meat/seafood in the recipe but I like to add shrimp or chicken to it but you can do whatever you like.


Ingredients :


1/2 pound Chinese egg noodles (I use 12 oz. of Angel Hair pasta or Soba Noodles are great also)
3 tablespoons dark sesame oil
2 tablespoons peanut oil (I don't have peanut oil so I used vegetable oil)
2 green onions, thinly sliced on the diagonal
1-inch piece fresh ginger, minced
3 garlic cloves, minced
1 teaspoon red chili paste, such as sambal oelek
2 tablespoons brown sugar
1/2 cup creamy peanut butter
3 tablespoons rice vinegar
3 tablespoons soy sauce
6 tablespoons hot water
1 tablespoon toasted sesame seeds
Cucumber slices, for garnish (I haven't added this but I usually do 1 red pepper thinly sliced)
Fresh cilantro leaves, for garnish


Directions:

Cook the noodles in large pot of boiling unsalted water over medium heat until barely tender and still firm. Drain immediately and rinse with cold water until cool. Drain the noodles really well and transfer to a wide bowl; toss with the sesame oil so they don't stick together.
In a small saucepan, heat the peanut oil over medium-low flame. Add the green onions, ginger, garlic, and chili paste. Cook and stir for a minute until soft and fragrant. Mix in the brown sugar, peanut butter, vinegar, soy sauce, and hot water. Stir until the sugar is dissolved and the peanut butter has smoothed out. Toss the noodles with the peanut sauce until well coated. Serve at room temperature or chilled. Garnish with the sesame seeds, cucumber slices, and cilantro.

Snow Popcorn

Submitted by Hannah


This past Christmas my good friend Alaya introduced me to a naughty new snack. We have always loved popcorn in my house and we usually eat it with junior mints because that is how we always did it when I was a kid, and the salty sweet is to die for. Well, this simple recipe kicks that up a notch. It seems no matter how much I try to cook healthy and waistline friendly foods I am always drawn back to something sweet and not so waistline friendly. This is such a yummy treat to have when watching a movie or playing a game. This Christmas I gave some away to family and friends and I think they liked this more than the presents I got them so next year maybe I'll save my money and make some extra Snow Popcorn. :)


Ingredients:


1 bag of white chocolate chips


honey roasted peanuts


8 cups popped popcorn


plain M & M's


salt


Directions:


You can use microwave popped popcorn but my favorite is the homemade and I love the Whirley Pop so that is what I use. Pop your popcorn and set it aside. Melt the white chocolate chips in the microwave at 30-40 second intervals stirring in between times until completely melted. In a large bowl put half of the popcorn or all of it depending on the size of your bowl and add the melted chocolate and mix thoroughly. Once that is mixed completely sprinkle with salt and then add M & M's and peanuts to taste. Repeat steps until you have used up all of your popcorn. On a cookie sheet spread out this mixture so it can cool and when the chocolate has set it is ready to enjoy!!!

Puddles (by guest cook, Susan Kolberg)


Puddles are a non-bake cookie type treat I made for my 6 children while they grew up. Four of those children are my daughters Lisa, Heather, Melanie, and Hannah who make up this "Minnesota Bread Blog". I am a guest in Lisa's kitchen today.


Some of Lisa's kids and their cousins are playing outside on this mid April and snow covered day. (The fact that it snowed last night is just wrong) Nevertheless, Lisa mentioned that the kids might like a sweet treat, so I looked in our family cookbook called; Memorable Minnesota Meals & Munchies, Dec. 2000. On page 63 I found our Puddle recipe.


Here goes:


Ingredient List:


2 C sugar

1/2 C milk

3 T cocoa

3 tsp. vanilla

1 stick butter or margerine ( I use butter)

1/2 C peanut butter ( We like crunchy)

3 C quick oatmeal


Bring sugar, milk, cocoa, vanilla, and butter to a full boil. Boil for 1 to 1 1/2 minutes. (boil too long and cookies fall apart, boil too short and your puddles spread---good luck on your guessing)


Turn off heat and add peanut butter, stirring until melted. Stir in Oatmeal. Drop by teaspoonfuls onto wax paper or parchment or silicone baking sheets and allow to cool.


Yum.


Signing off -- Grandma Kolberg


Monday, April 18, 2011

M & M Cookies


I got this recipe when I was a missionary in California. It was from a lady who said it was her family recipe, besides that, I don't know where it is from. But we like it.
Pre heat oven 375
2 c crisco (must be butter flavored)
1 1/2 c sugar
1 1/2 c brown sugar
3 tsp vanilla
2 tsp baking soda
2 tsp salt
1 tsp water
4 eggs
5 c flour
3 c m & m's
Mix sugars, crisco, eggs and vanilla until blended well. Add in the remaining ingredients and stir until combined.
Place heaping teaspoons full of dough on parchment lined baking sheet. Bake at 375 for about 11 min or until done.
Remove to a cooling rack and enjoy!

Saturday, April 16, 2011

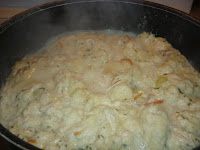
Chicken and Dumplings


This recipe is one to keep somewhere close by. My family just loves it. It is an adaptation from a recipe I found on http://www.foodnetwork.com/ I make it my own way of course but it is soooo delicious.


We made it today because it is the middle of April and we woke up to snow! So, to sooth our cold selves, we needed a warm comfort dish, and this fit the bill perfectly!


I hope you enjoy.


5 stalks celery chopped small

1 large onion chopped small

1/2 bag shreded carrots or 3 lrg carrots chopped small

4 cloves garlic minced (or garlic garlic from tastefully simple...1 tbsp)

3 quarts water and enough chicken paste per directions for that amount of water.

(or just use chicken stock...3 quarts of it)

2 tsp parsley

2 tsp thyme

2 tbsp butter

2 tbsp olive oil

1/4 cup flour

2 to 3 cups shredded, pre-cooked chicken


Dumplings:

2 cups flour

1 tbsp baking powder

1 tsp salt

2 eggs

3/4 to 1 cup buttermilk (I use reg skim milk)

(I add some thyme to this also...maybe 1 tsp)


1. In medium to large stock pot, put in the 2 tbsp of olive oil and 2 tbsp of butter. Add the chopped onion, celery, and carrot. Stir around to cook evenly. I usually add about 1/2 cup water and put a lid on so the vegies are soft. Cook until they are just barely tender.


2. Add 1/4 cup of flour and stir/cook for about 2 min. to get rid of the flour flavor.


3. Add water..a little bit at a time stirring as you add it. Keep stirring until it is all mixed well.


4. At this point add in the chicken soup base/paste and the shredded chicken.


5. Cover and let simmer for 10 min. Meanwhile, mix up the dumpling mix.


Dumplings:


1. Beat up the eggs and the milk with a fork.

2. Add the dry ingredients and stir together until moistened.

3. Take cover off pot and drop by spoonfuls into the soup mixture.

**they will touch each other and may have to be dropped on top of each other to fit. Don't worry about that.

4. Put the cover back on the pot, turn the heat down to a low simmer and let it cook for about 15 minutes. You can peak at it here and there and give it a little stir if you want to.

5. When the dumplings are all puffed up and sort of dry looking, they are done.


Time to eat!

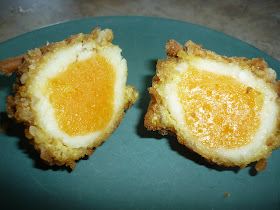
Pretzel-Crusted Fried Cheese


Once again I was perusing my Food Network Magazine and found a recipe that sounded fun. I just made them and they are "resting" in the fridge before I fry them. One thing I have noticed already is that they could have been made MUCH smaller. By the time I had it all assembled, they were pretty large.

Can't wait to try them!


For the fried cheese:

8 ounces provolone or part-skim mozzarella cheese, cubed (I used mozzarella)

2 tbsp grated parmesan cheese

4 ounces yellow cheddar cheese, cubed

1 1/2 cups plus 2 tsps all-purpose flour

1 8 ounce bag thin pretzel sticks

freshly ground pepper

4 large eggs

5 tbsp spicy mustard

peanut oil, for frying


For the Sauce:

2 tbsp horseradish, drained

1 tbsp spicy mustard

1/4 cup sour cream


1. Make the fried cheese: Pulse the provolone and parmesan in a food processor until the cheese gathers into a ball; transfer to a bowl. (I used my vita mix blender)

2. Pulse the yellow cheddar and 2 tsp flour in the food processor until smooth. (mine wasn't smooth, just little crumbs)

3. Form teaspoonfuls of the yellow cheddar mixture into 12 small balls; roll between your hands until smooth. (I would make them smaller next time)


4. Transfer to a plate and freeze until firm, about 15 minutes.

5. Wipe out the food processor. Add the pretzels and pulse until finely ground with a few chunks; transfer to a shallow dish.

6. Mix the remaining 1 1/2 c flour and 1/2 tsp pepper in another dish.


7. Whisk the eggs and mustard in a third dish.


8. Roll tablespoonfuls of the provolone mixture into 12 balls (the same amount of cheddar balls you have) then flatten into disks.


9. Put 1 yellow cheddar ball on each disk, then shape the provolone around it, enclosing the cheddar. ( that was surprisingly easy)


10. Dip the cheese balls in the egg mixture, then dredge in the flour; return to the egg mixture, then roll in the pretzel crumbs, turning to coat.


11. Refrigerate at least 20 min and up to 3 hours.

12. Preheat the oven to 350.

13. Heat 1/2 inch peanut oil in a saucepan until a deep fry thermometer registers 360.

14. Fry the cheese balls in batches, turning, until golden, 30 seconds to 1 min.

15. Remove from oil and transfer to a rack set in a baking dish and bake until heated through. About 5 to 7 minutes.

Make the Sauce:

1. Whisk the horseradish, mustard and sour cream in a bowl.

2. Serve with the fried cheese.

**(Update: I did make them yesterday. They were good. Too big though. We had to cut them up to eat them. I would definately make them smaller, by atleast 1/2. Only worth the effort if you are having a get together or something fun.)**

Friday, April 15, 2011

Hashbrown Quiche

Submitted by Hannah

I'm not always a big egg fan so I'm always looking for some sort of breakfast food that I will enjoy and my husband will too since he loves eggs. I found this recipe on Allrecipes.com and I have loved it ever since I tried it. It is a very simple recipe and not one of those recipes that you can't stop oohing and aahing about but it is a very good go to family meal that even my son loves. I like to make this for dinner most of the time because let's face it with a 3 year old and a 3 month old the last thing I'm thinking of doing at 7 am is making a delicious homemade breakfast, most of the time we are having cereal or peanut butter toast which is Nicholas's favorite. I usually serve this with some fruit or fruit smoothies which is a great way to sneak in some extra fruit in his diet. You will see below how I tweak this recipe a bit and that is what I love about it it always turns out no matter what you put in it.

Ingredients :

3 cups shredded hash brown potatoes

1/3 cup butter, melted (I only use about 2 Tbsp because I don't think it needs more)

1 cup diced cooked ham

1/4 cup chopped onion (green onions are my favorite in this)

1 cup shredded Cheddar cheese

2 eggs ( 2 eggs definitely doesn't seem enough to me so I usually add 2-3 additional egg whites)

1/2 cup milk ( I bump up the milk to about 3/4 cup with the additional eggs)

salt and pepper to taste


Directions :
Preheat oven to 425 degrees F (220 degrees C). Press hash browns onto the bottom and sides of a 9 inch pie dish. Drizzle with melted butter, and sprinkle with seasoning salt. Bake in preheated oven for 20 minutes, or until beginning to brown. In a small bowl, combine ham, onion and shredded cheese. In a separate bowl, whisk together eggs, milk, salt, pepper, and a little seasoning salt. When crust is ready, spread ham mixture on the bottom, then cover with egg mixture. Reduce oven temperature to 350 degrees F (175 degrees C.) Bake in preheated oven for 20 to 25 minutes, or until filling is puffed and golden brown. (With the additional eggs it can take closer to 30-35 minutes to cook)

Mini Perfect Party Cake Cupcakes


Submitted by Hannah


The other day my son Nicholas and I were so excited to have a beautiful day in Minnesota after such a long harsh winter that we decided to bake a treat for our neighbors. We decided to make mini cupcakes using one of my favorite frosting recipes and we tried a new cake recipe that turned out to be delicious. These pretty and tasty little treats were the perfect way to say hello to the neighbors after hibernating for six months (and I'm not even kidding on how long we have been couped up, so sad). I found that this frosting recipe happens to be good on everything I have tried it with. I have gotten many compliments on it and have been asked for the recipe many times. The cake recipe will definitely be a cake I would make again and it is just a delicious white cake with just a hint of lemon flavor. I happen to love cake so when I find a good recipe that is the perfect combination of flavor and texture I get excited. I chose to make these into mini cupcakes and cook them a shorter amount of time as the recipe calls for it to be a traditional cake.


Perfect Party Cake


Ingredients:


2 ¼ cups cake flour


1 tbsp. baking powder


½ tsp. salt


1 ¼ cups whole milk or buttermilk


4 large egg whites


1 ½ cups sugar


2 tsp. grated lemon zest


1 stick (8 tbsp.) unsalted butter, at room temperature


½ tsp. lemon extract (I omitted this)


Directions: Center a rack in the oven and preheat the oven to 350°. Butter two 9-inch round cake pans and line the bottom of each pan with a round of buttered parchment paper. Dust both pans with flour, shaking out the excess. Set aside. Sift together the flour, baking powder and salt. In a medium bowl, whisk together the milk and egg whites. In the bowl of an electric mixer, combine the sugar and lemon zest. Mix them with your fingers until the sugar is moist and fragrant. Add the butter to the sugar mixture and beat on medium speed for 3 minutes, until light and fluffy. Beat in the lemon extract. Add one third of the flour mixture, continuing to beat on medium speed. Beat in half of the egg mixture, then half of the remaining dry ingredients until incorporated. Add the rest of the milk and eggs, beating until the batter is homogeneous, then add the last of the dry ingredients. Finally give the batter a good 2-minute beating to ensure that it is thoroughly mixed and well aerated. Divide the batter between the two prepared cake pans and smooth tops with a rubber spatula. Bake for 30-35 minutes, or until the cakes are well-risen and springy to the touch – a thin knife inserted in the centers should come out clean. ( For the cupcakes I only cooked them about 12-14 minutes.)


Not Too Sweet Frosting


Here is the frosting recipe:


1 Cup Milk


5 Tablespoons Flour


1/2 Cup Butter, softened ( You can use all butter in this recipe and omit the shortening if you would like)


1/2 Cup Shortening


1 Cup Granulated Sugar


2 teaspoons Vanilla Extract


Whisk flour and milk together in medium saucepan over medium heat until thickened. Pour into shallow dish, cover with plastic wrap and let cool (I put mine in the refrigerator for a couple of hours). Beat butter and shortening together for 4 minutes. Gradually add sugar to the butter mixture. Beat an additional 4 minutes. Slowly add the cooled flour paste to the butter mixture and beat an additional 4 minutes. Add vanilla and beat well.


Cake Source: Annie's Eats


Frosting Source: The Fat Bottomed Girl

Wednesday, April 13, 2011

Red Velvet Cupcakes

Submitted by Heather


Have you ever had Red Velvet Cupcakes? You should try this recipe, whether you have or have not.  They're hard to describe, except to say that they're delicious. They have a tiny bit of cocoa, but they're not supposed to taste like chocolate, so don't expect it. They're a little tangy, though that doesn't sound quite right either. They're just good, so try them.

As crazy as it may sound, I never had a red velvet cake until about 2 years ago. I'd never heard of it before and wasn't really sold once I tasted it.  Maybe that was because it was store bought.  Since then, I've had a few more chances to taste red velvet cake and have definitely become a fan. Just a bit of advice -  stay away from the red velvet cake mix.  It's no where near as good as homemade and actually tastes kind of strange.
So, on to the recipe. I got this from a great food blog called annies-eats.com. She has lots of great recipes, but I particularly liked that this recipe had been tested against at least 4 other red velvet cupcake recipes to see which was the best (this one).  I also posted this recipe on my friend Lara's blog, Recipe Shoebox, after she very kindly asked me to do a guest post around Christmastime.  Check out her blog - she's got some wonderful recipes.  After you make these cupcakes, give most of them away so you don't eat them all. They have a lovely, unique flavor that's hard to resist!

**Before we had this little blog, I guest posted this recipe on my friend Lara's blog - Recipe Shoebox.  I put a lot more pictures of the steps on that post, so go check it out if you'd like to see more process steps. 

Red Velvet Cupcakes
Yield: about 24 cupcakes

Ingredients:
For the cake:
2½ cups cake flour
1½ cups sugar
1 tsp. baking soda
1 tbsp. cocoa powder
1 tsp. salt
2 large eggs
1½ cups vegetable oil
1 cup buttermilk
2 tbsp. (1 oz.) liquid red food coloring*
1 tsp. vanilla extract
1 tsp. distilled white vinegar

For the frosting (you may want to double this):
8 oz. cream cheese
5 tbsp. unsalted butter, at room temperature
2 tsp. vanilla extract
2½ cups confectioners’ sugar, sifted

Directions:
Preheat the oven to 350° F.  Line cupcake pans with paper liners.  In a medium bowl, sift together the cake flour, sugar, baking soda, cocoa powder and salt.  It's important to sift, since I've found that cocoa sometimes doesn't break up with a whisk and you're left with little brown chunks in your batter.  In the bowl of an electric mixer, combine the eggs, vegetable oil, buttermilk, food coloring, vanilla and vinegar.  Beat on medium speed until well blended.  Mix in the dry ingredients on low speed and beat until smooth, about 2 minutes.

Divide the batter evenly between the prepared liners.  Bake, rotating the pans halfway through baking, until a toothpick inserted in the center comes out clean, about 18 minutes.  Let cool in the pans 5-10 minutes, then transfer to a wire rack to cool completely.

To make the frosting, combine the cream cheese and butter in the bowl of an electric mixer.  Beat on medium-high speed until well combined and smooth, about 2-3 minutes.  Mix in the vanilla extract.  Gradually beat in the confectioners’ sugar until totally incorporated, increase the speed and then beat until smooth.  Frost cooled cupcakes as desired. My favorite way is to put the frosting in a piping bag fitted with a large star or circle tip.  It gives it a fancy look.

*If you're using gel food coloring, you're going to just have to eyeball the quantity.  I would suggest, though, that you mix the gel coloring in a small bowl with some of the batter, so that you don't get any gel chunks in your batter.  Not that that happened to me or anything.

Recipe Source:  Annie’s Eats

S'more Brownies


These look so fun! I haven't eaten one yet. Tonight for Young Womens we are planning a "High Adventure" camp out with the girls. We wanted to have some sort of "camp" inspired treat while we plan.... what is better at camp than smores? Not much. So, here it is. (if I taste it and it is not all it promises to be, then you won't see this post for long! I will remove it) I found this recipe on the Food Network Website. http://www.foodnetwork.com/
**(update...OH YUM! I had one last night and it was amazing)**

Crust:

6 tbsp unsalted butter, melted

1 1/2 cups crushed graham cracker crumbs

2 tbsp sugar

pinch of salt

Brownie:

8 tbsp unsalted butter (1 stick)

4 ounces unsweeteened chocolate, chopped

1 cup packed brown sugar

3/4 cup white sugar

1 1/2 tsp vanilla

1/2 tsp fine salt

4 large cold eggs

1 cup all purpose flour


Topping:

4 cups large marshmallows


Directions:

Preheat oven to 325 degrees. Line as 8 x 8 square pan with foil or parchment paper, overhanging the edges about 1 inch.


For the crust: Lightly butter the foil. Stir the butter together with the crumbs, sugar, and salt in a medium bowl. Press the crumb mixture evenly over the bottom of the pan. Bake until golden brown, about 20 minutes.


Meanwhile, make the brownie. Put the butter and chocolate in a medium microwave safe bowl. Melt in microwave on 75% power for 2 minutes. Stir, and microwave again until completely melted, about 2 more minutes. Stir in the sugars, vanilla and salt into the melted chocolatge.


Add the eggs and beat vigorously to make a thick and glossy batter.


Add the flour and stir until just incorporated.


Pour the batter into the prepared pan. Bake until the top is crispy and a toothpick inserted into the middle comes out mostly clean, with a few crumbs, about 40 to 45 min.


Remove from the oven, carefully position the rack about 6 inches from the broiler and preheat on low. Layer the marshmallows across the top and toast under the broiler until golden. (I cut the large marshmallows in half and put them on top...it was so tall already!)


Watch it closely!


Cool on rack, gently remove the brownies from the pan using the flaps of foil/parchment paper. Carefully separate any marshmallow from the foil and fold away. Cut into 12 squares.

**Tip: 1) I cooked these longer than it called for by about 15 min. It was still not done in the center. The toothpick was still wet..ish and I thought maybe it would firm up when cooled. nope. So make sure your toothpick is pretty much clean.

2) Cutting them was an experience. The marshmallows are beyond sticky. I finally sprayed my knife with cooking spray and the helped some. Make sure they are pretty cool and I think that will also help. ENJOY

Tuesday, April 12, 2011

Monster Marshmallow Cookies


All I can say is....Oh yeah, this is a keeper! I found this recipe in one of my favorite magazines: Food Network Magazine (April 2011 issue). I made a few adjustments that coincided with my likings of course! : )

2 c all purpose flour

1 tsp baking powder

1/2 tsp baking soda

2 sticks unsalted butter, softened

1 c granulated sugar

1 c light brown sugar

2 large eggs, at room temp

1 tbsp vanilla

2 cups quick cooking oats

1 1/4 c crispy rice cereal

1 c milk chocolate chips (I used semi sweet)

1 c coarsely chopped pecans (I used peanuts )

1 c miniature marshmallows (I only had the regular size, I cut them up)


For the Topping

1/2 c milk choc chips (I used semi sweet)

1/2 c miniature marshmallows

2 1/2 tsp half and half (I used skim milk)

Pinch of cayenne pepper ( I didn't use)

1/3 c finely chopped pecans (I didn't use)


1. Make the Cookies: Preheat the oven to 350. Line 2 baking sheets with parchment paper. (or spray them) Combine the flour, baking powder, and baking soda in large bowl.

2. In separate bowl, beat the butter and both sugars with mixer until fluffy. Beat in the eggs one at a time, then beat in the vanilla.

3. Add the flour mixture and beat on low speed until combined.

4. Stir in the oats, cereal, chocolate chips, pecans and marshmallows into the dough.

5. Drop heaping tablespoonfuls of the dough onto the prepared sheet, about 3 inches apart.

6. Bake the cookies until golden, 10 to 12 minutes.

7. Transfer to racks and cool.

8. Make the Topping: Combine the chocolate chips, marshmallow, and half and half and cayenne in a saucepan over medium heat; cook, stirring, until the mixture is smooth, about 5 minutes.

9. Drizzle the mixture over the cookies and let set. ( mine was never quite smooth enough to "drizzle"...)


**Tip** Don't try to remove the cookie from the cookie sheet until it has cooled for a couple of minutes. You will have issues.


Cinnamon Rolls

Submitted by Melanie

My kids sat at the oven waiting the whole time while these were baking. They are so yummy, you can't just eat one!

Ingredients


  • 1 quart Whole Milk (I used skim milk to save on calories)
  • 1 cup Vegetable Oil
  • 1 cup Sugar
  • 2 packages Active Dry Yeast, 0.25 Ounce Packets
  • 8 cups (Plus 1 Cup Extra, Separated) All-purpose Flour
  • 1 teaspoon (heaping) Baking Powder
  • 1 teaspoon (scant) Baking Soda
  • 1 Tablespoon (heaping) Salt
  • Plenty Of Melted Butter
  • 2 cups Sugar ( I used brown sugar)
  • Generous Sprinkling Of Cinnamon
Cream cheese frosting

  • 1 (3 ounce) package cream cheese, softened
  • 1/4 cup butter, softened
  • 1 1/2 cups confectioners' sugar
  • 1/2 teaspoon vanilla extract
  • 1/8 teaspoon salt

Preparation Instructions
Mix the milk, vegetable oil and sugar in a pan. Scald the mixture (heat until just before the boiling point). Turn off heat and leave to cool 45 minutes to 1 hour. When the mixture is lukewarm to warm, but NOT hot, sprinkle in both packages of Active Dry Yeast. Let this sit for a minute. Then add 8 cups of all-purpose flour. Stir mixture together. Cover and let rise for at least an hour.


After rising for at least an hour, add 1 more cup of flour, the baking powder, baking soda and salt. Stir mixture together. (At this point, you could cover the dough and put it in the fridge until you need it – overnight or even a day or two, if necessary. Just keep your eye on it and if it starts to overflow out of the pan, just punch it down).


When ready to prepare rolls: Sprinkle rolling surface generously with flour. Take half the dough and form a rough rectangle. Then roll the dough thin, maintaining a general rectangular shape. Drizzle 1/2 to 1 cup melted butter over the dough. Now sprinkle 1 cup of sugar over the butter followed by a generous sprinkling of cinnamon. Now, starting at the opposite end, begin rolling the dough in a neat line toward you. Keep the roll relatively tight as you go. Next, pinch the seam of the roll to seal it. Spread 1 tablespoon of melted butter in a seven inch round foil cake or pie pan. Then begin cutting the rolls approximately ¾ to 1 inch thick and laying them in the buttered pans. Repeat this process with the other half of the dough.


Let the rolls rise for 20 to 30 minutes, then bake at 400 degrees (see note below) until light golden brown, about 15 to 18 minutes. For the frosting, mix together all ingredients listed and stir well until smooth. It should be thick but pourable. Taste and adjust as needed. Generously drizzle over the warm rolls. Go crazy and don’t skimp on the frosting. I sometimes double the recipe. Note: My rolls don’t work for me at 400 degrees anymore. I now bake them at 375 degrees.


Source for cinnamon rolls thepioneerwoman.com

Source for Cream Cheese frosting Allrecipes.com